

Good to satisfy you! I’m Michael, a visible designer based mostly in Stockholm. I grew up within the Midwest within the US and labored in promoting earlier than switching to interactive initiatives. In my free time, I follow new expertise in AfterEffects and Blender to create prototypes.
This was one among my current animations once I tried out some gem supplies in Blender.
My Program Stack
I usually use these packages and plugins when creating prototype animations:
- Blender – For 3D movement and visuals
- Figma – For format and UI
- AfterEffects – For the movement and stitching within the 3D animation
- AEUX – A useful plugin to transform Figma to an AE file
- Motion 4 from Mt. MoGraph – A ton of useful scripts to hurry up the animation course of
- Flow – A plugin to make modifying easing curves loads easier
Idea and Explorations
I started with the thought of utilizing gems as the principle visible. Since I knew I wished to play with gemstone materials, I began in Blender to create some belongings that I may use when enjoying round with layouts in Figma. One thing in regards to the gems felt like little rewards for achievements and I appreciated the idea of incomes gems for finishing primary grownup duties.
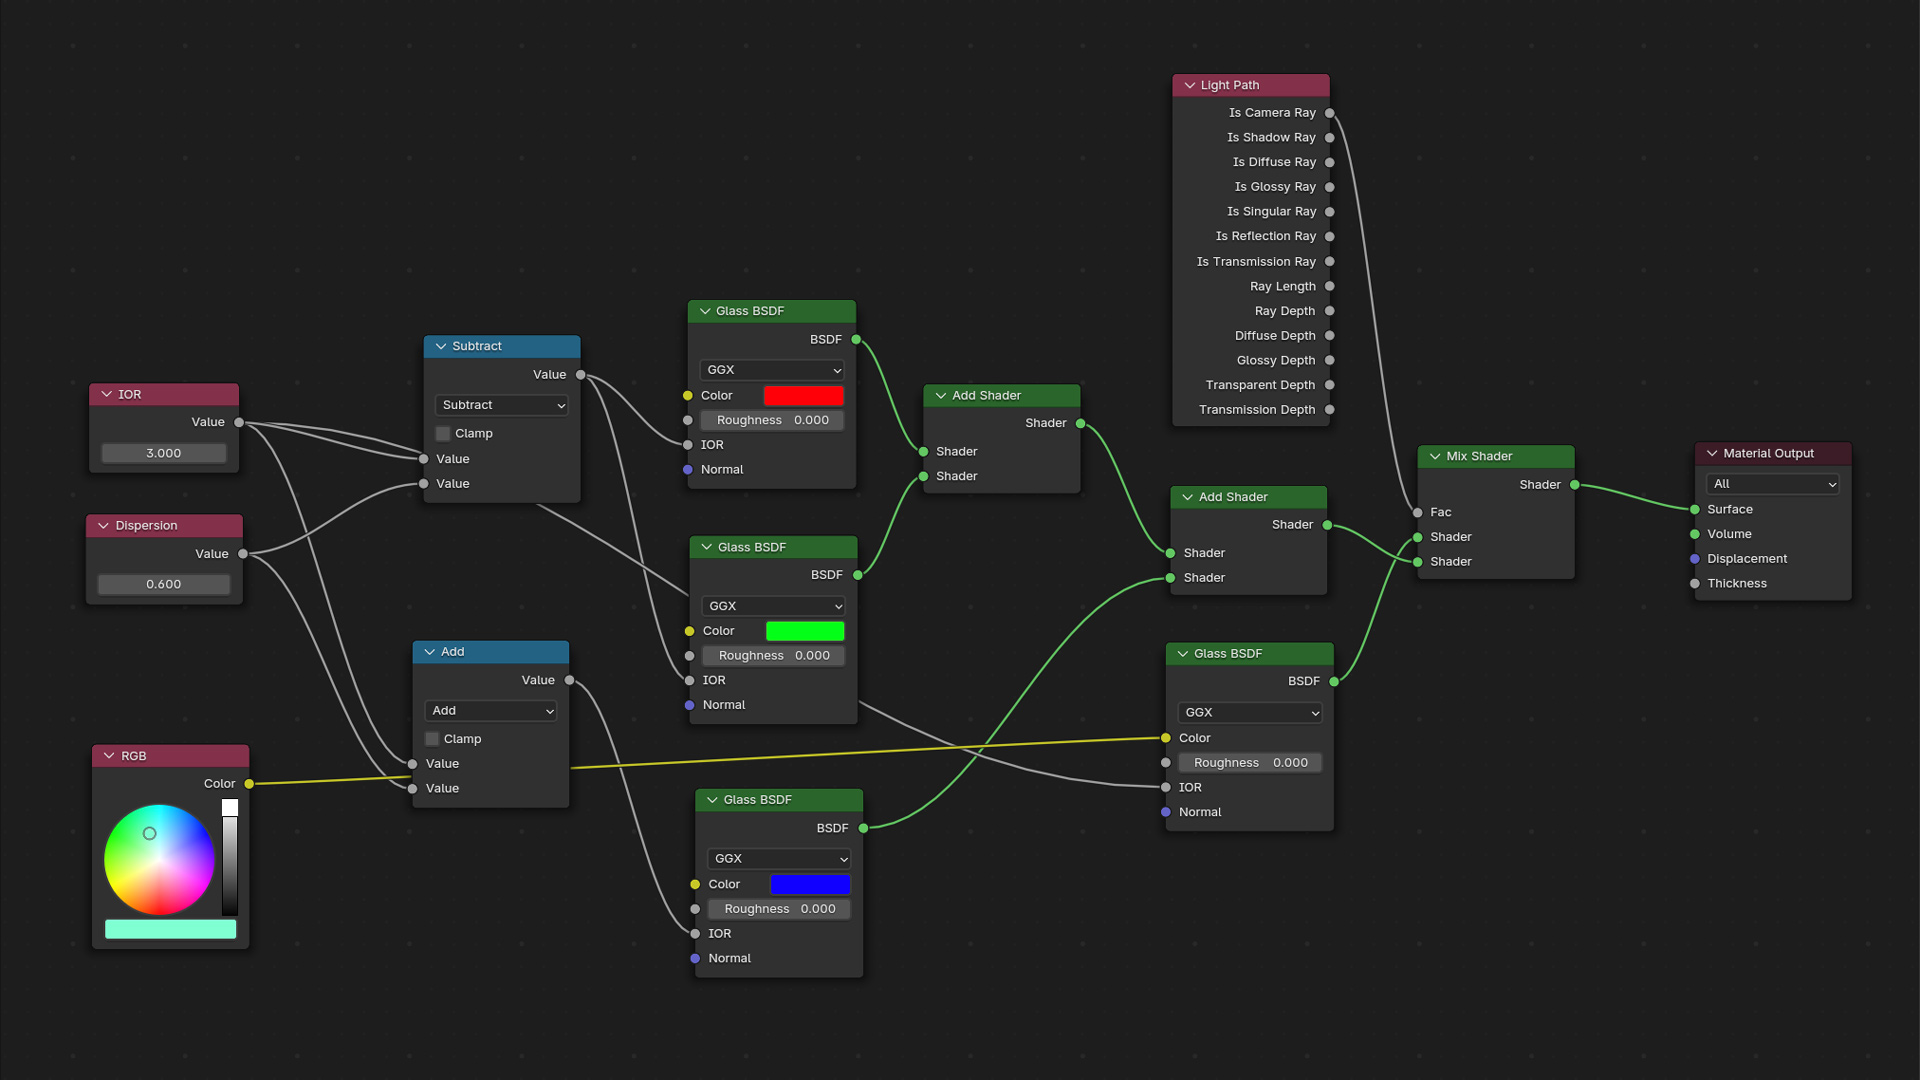
Glass and gems are at all times a fancy shader node tree that I by no means can bear in mind methods to arrange so I used this tutorial from blenderbitesize to construct the bottom materials for the gems.
Right here’s the ultimate shader setup in case you’re curious. A lot of the glass tutorials I’ve adopted have this similar output in the long run the place the refractions are damaged out in Crimson, Blue, and Inexperienced. Blender’s normal Glass BDSF works okay, however to get the chromatic aberration that’s seen in gems and prisms, an additional layer of nodes is required to interrupt up the sunshine.
The good half about this particular setup is that you may search for the IOR and dispersion qualities for precise gems and use the true values to get an additional layer of actuality to the scene.
Animation Course of
I at all times use Blender and AfterEffects which might be tough to sync collectively. When you’re utilizing Cinema4D, the method is likely to be a bit easier since there’s some integration constructed into AfterEffects with Cinema4D, however Blender is free, so it’s at all times my go-to.
Every challenge may need a barely totally different workflow relying on the animation. Particularly, scroll animations like this one are the toughest since you are attempting to sync easing curves between two packages. It might get even trickier if the UI impacts the 3D by refracting the background or having the cursor work together with 3D (like in this Dribbble post). For this gemstone submit, I knew I wished some large scroll actions that will take up a while, and passed over the background refraction to simplify.
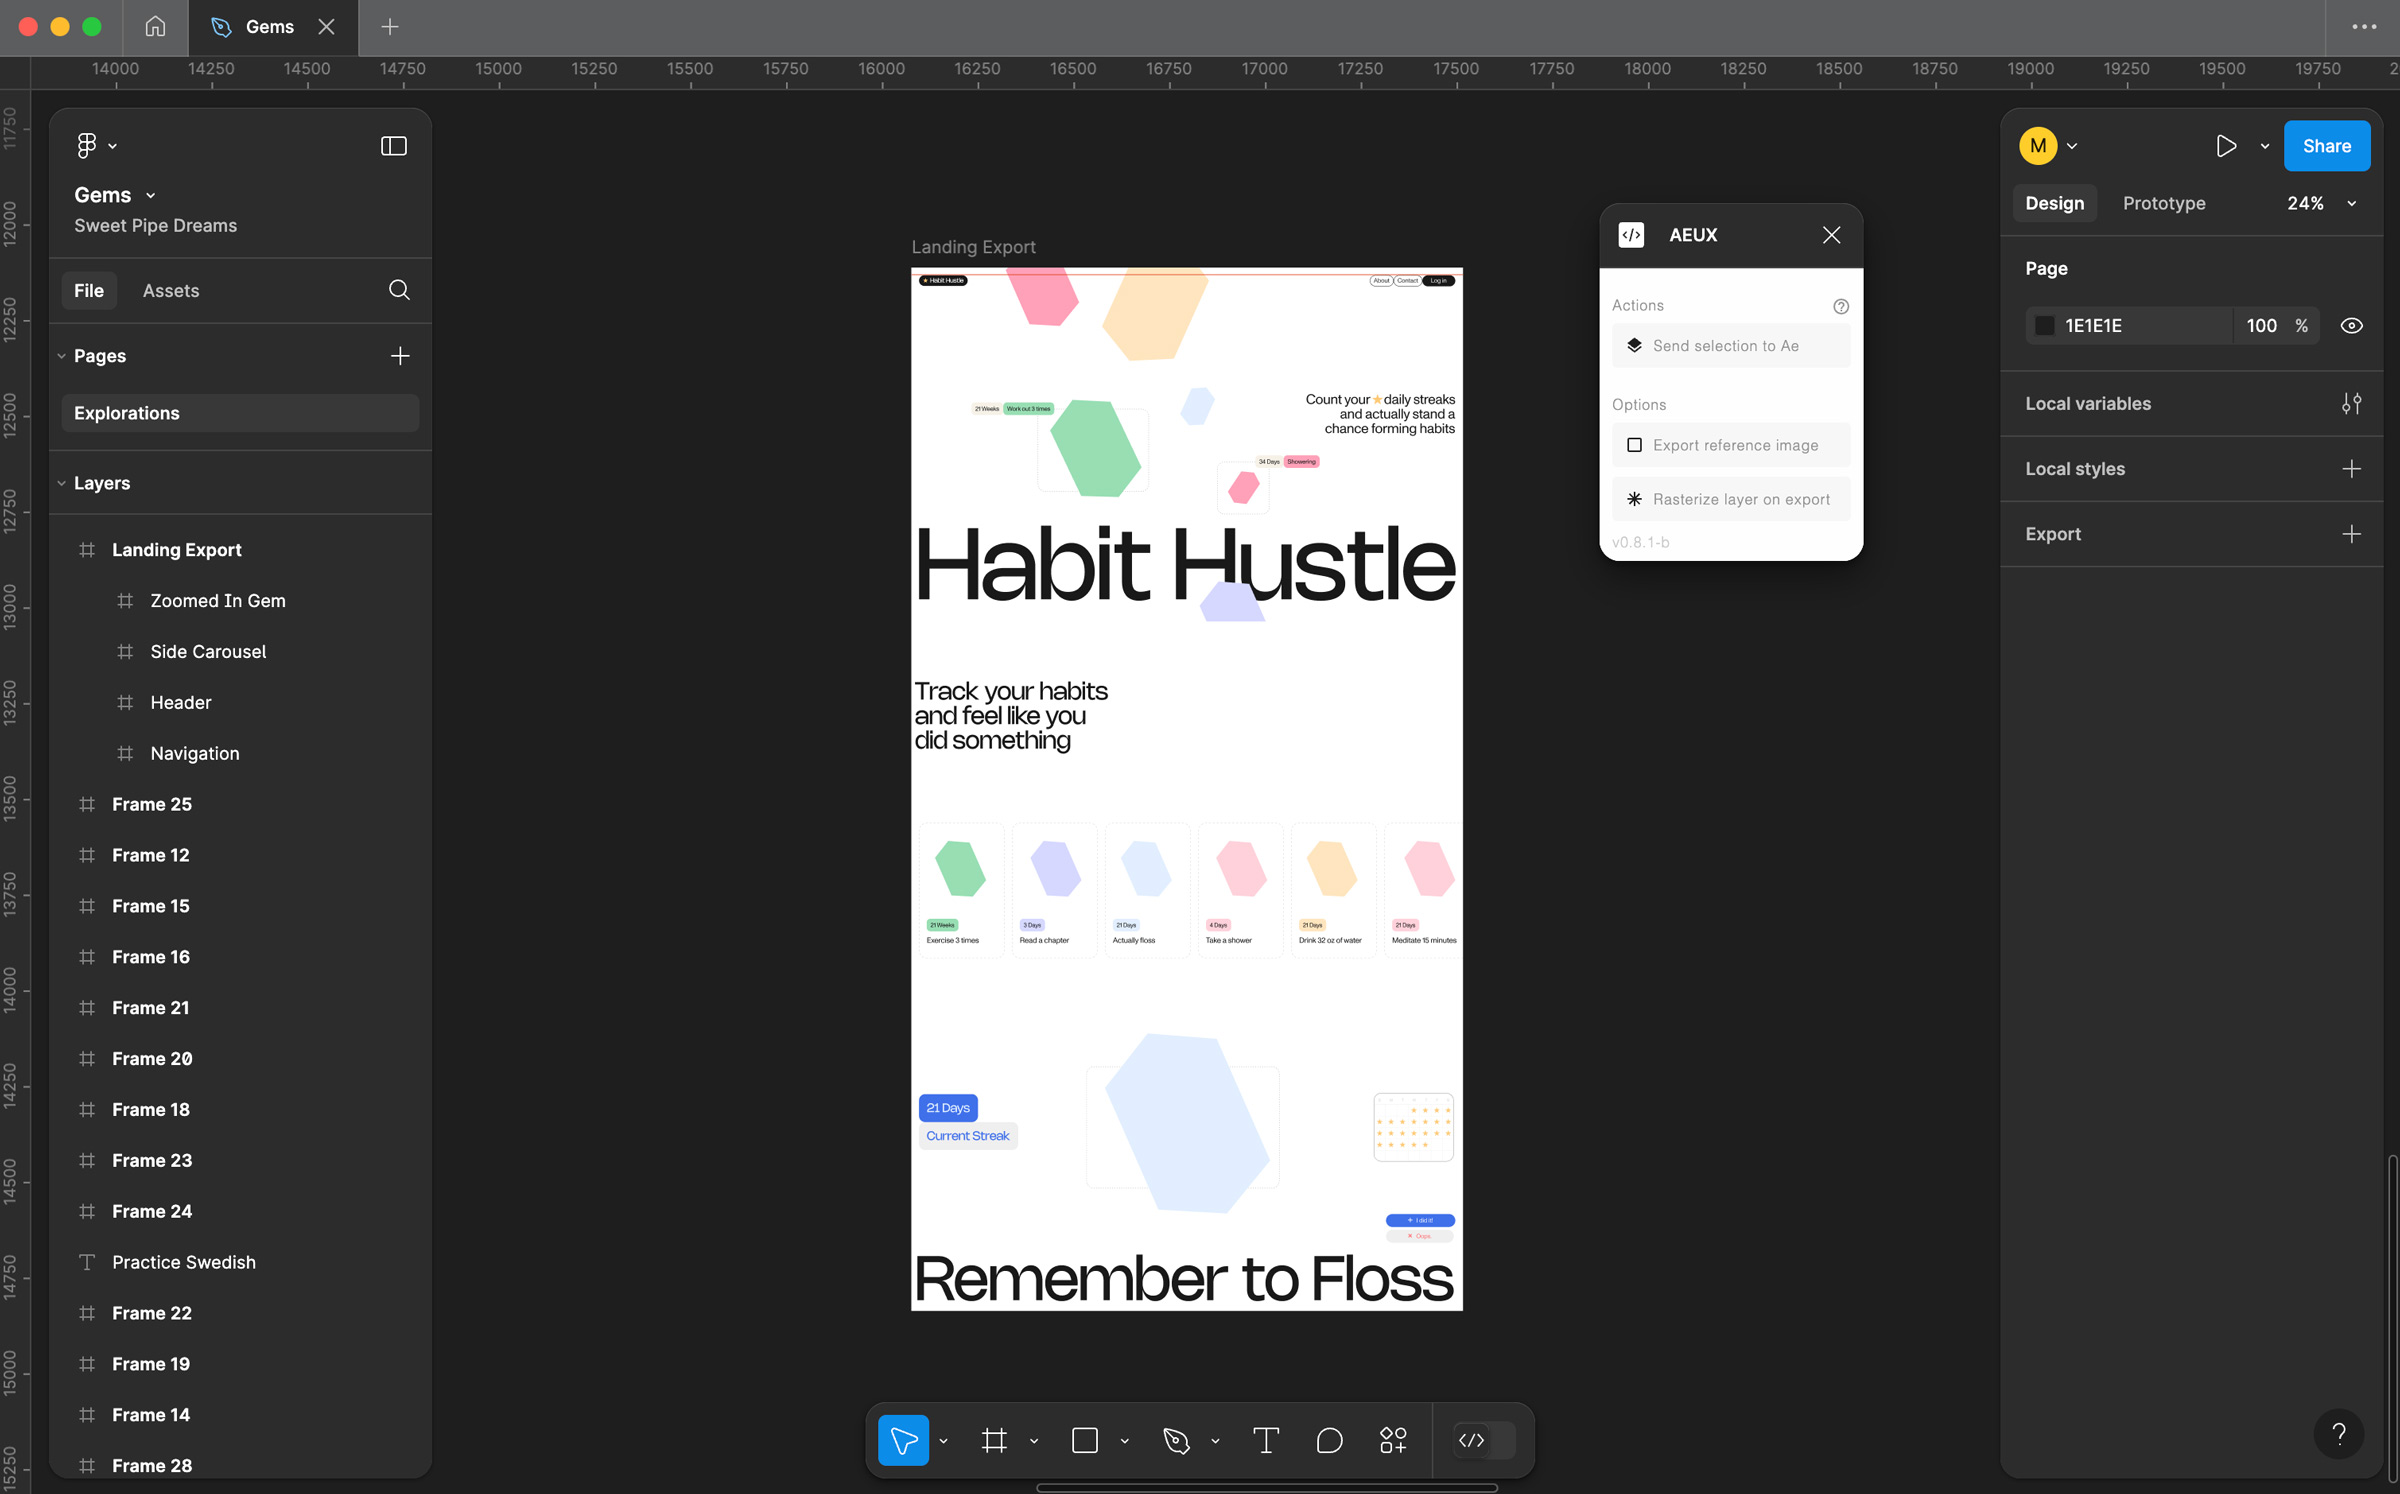
1. Export Format from Figma to AfterEffects
Figma and Adobe packages don’t work the most effective collectively, however AEUX is a useful plugin to simplify the method a bit. The draw back is that it may be a bit glitchy and takes a good quantity of cleanup in each Figma earlier than exporting and in AfterEffects earlier than beginning. Whereas it’s not excellent, it saves fairly a little bit of time.
Just a few methods I’ve realized by trial and error:
- Body any unused components collectively – Having as few layers as attainable to work with in AfterEffects makes the animations extra manageable to create.
- Sort is at all times messy – Not an important resolution for this drawback. The main nearly is at all times tousled and the sort is often positioned about 5-10px increased than you need. In addition to simply manually adjusting, you’ll be able to have AEUX rasterize the sort layers in the event you’re not animating them by including a bit of asterisk (*) in entrance of the layer identify.
- Background Colours on the web page don’t routinely come over – Both create a brand new form in AfterEffects for the background or create a rectangle in Figma because the background.
- Vector shapes are a bit unpredictable – The easiest way to keep away from bizarre vector shapes is to stipulate the Flatten Choice (Cmd + E) in Figma earlier than exporting. Some shapes you don’t need to do that with (often circles and rectangles) as a result of there are a number of useful AfterEffects options with primary shapes, however complicated shapes should be flattened.
- Title your layers in Figma – I often do that… Until I’m feeling lazy. It at all times saves me time afterward in AfterEffects so I don’t have to hunt for layers. It additionally is an efficient alternative to wash up the file.
2. Construct Animation in AfterEffects
That is vital to do first to get the timings down. The render time for Cycles in Blender is sort of lengthy and even longer when a Glass shader is concerned, so determining the timing of the entire animation first helps. When you can at the very least get the principle concept first in AfterEffects, it should save a headache afterward.
Utilizing a number of nice plugins can assist too. These are my two go-to ones:

- Movement 4 from Mt MoGraph – There are a number of helpful options in right here for menial AE duties and much more that I ought to use, however at all times neglect.
- Anchor Level Changes – Rapidly change the place the anchor factors are on a form
- Textual content-Break – Break aside textual content into form layers both as letters, phrases, or strains
- Stagger – Area out layers within the timeline to create stagger results (like I’ve on the “Behavior Hustle” title)

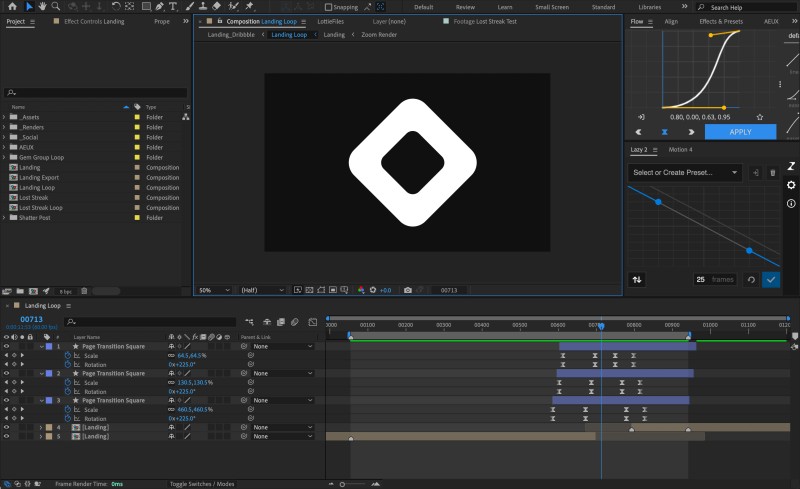
- Circulate – I take advantage of this plugin to animate easing values as a substitute of the graph editor. It makes the curves a lot simpler to visualise and edit than simply utilizing the graph editor to verify the curves after.
- Copy/Paste Easing Values – The good half is that you may choose any two tweens on the timeline and replica the easing worth to every other keyframes. It helps a ton to maintain all of your easings feeling linked.
- Translate Easing Values to Code – The numbers beneath the graph editor (e.g. 0.48, 0.05, 0.20, 1.00) are additionally excellent at hand to a developer and can be utilized in most animation frameworks as nicely.
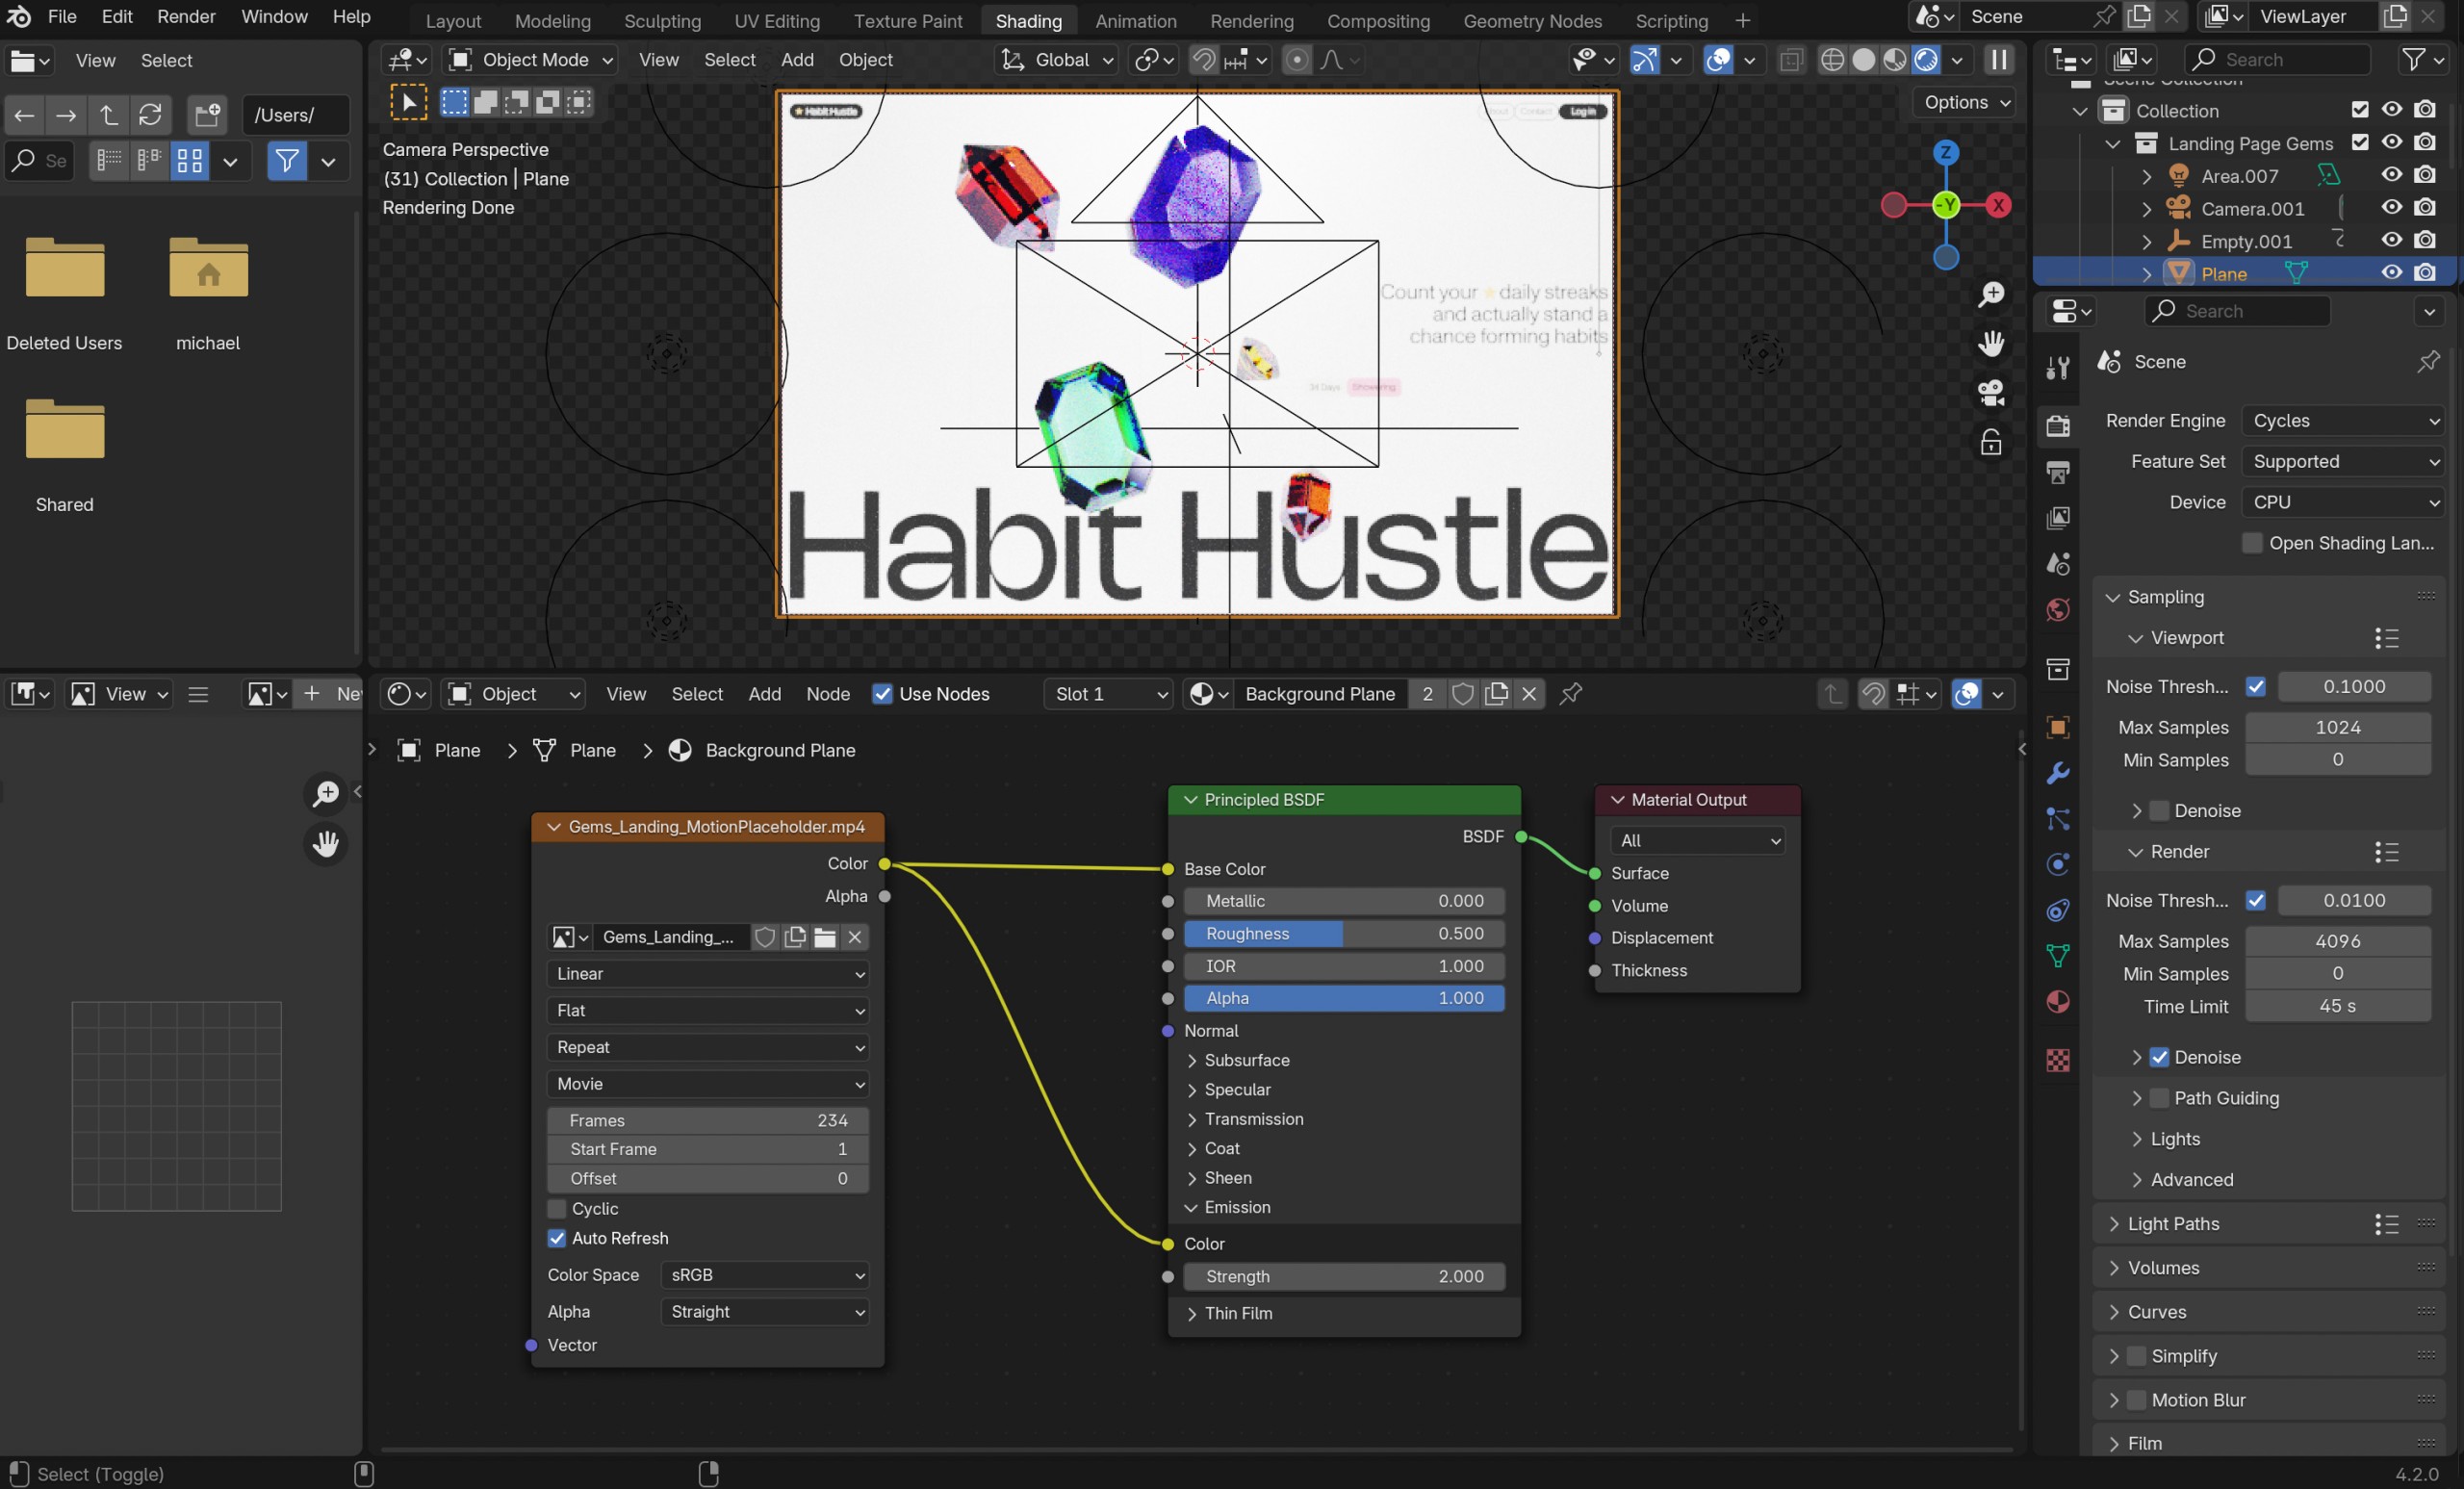
3. Export Tough Animation from AfterEffects into Blender
I put the exported video from AfterEffects as a texture on a aircraft in Blender with the identical ratio as my AfterEffects comp, then use this as a reference for timings within the animation. Make sure that to click on Auto-Refresh on the picture texture node so it updates on each body and places within the right variety of frames Blender ought to play from the animation. Additionally, it’s vital to remain in Cycles to see the video.
This simply offers me a tough concept of how the animation will work. Usually, the animation I export is loads rougher than this. All I have to know is the timings of the scroll and once I ought to make any large strikes in Blender.
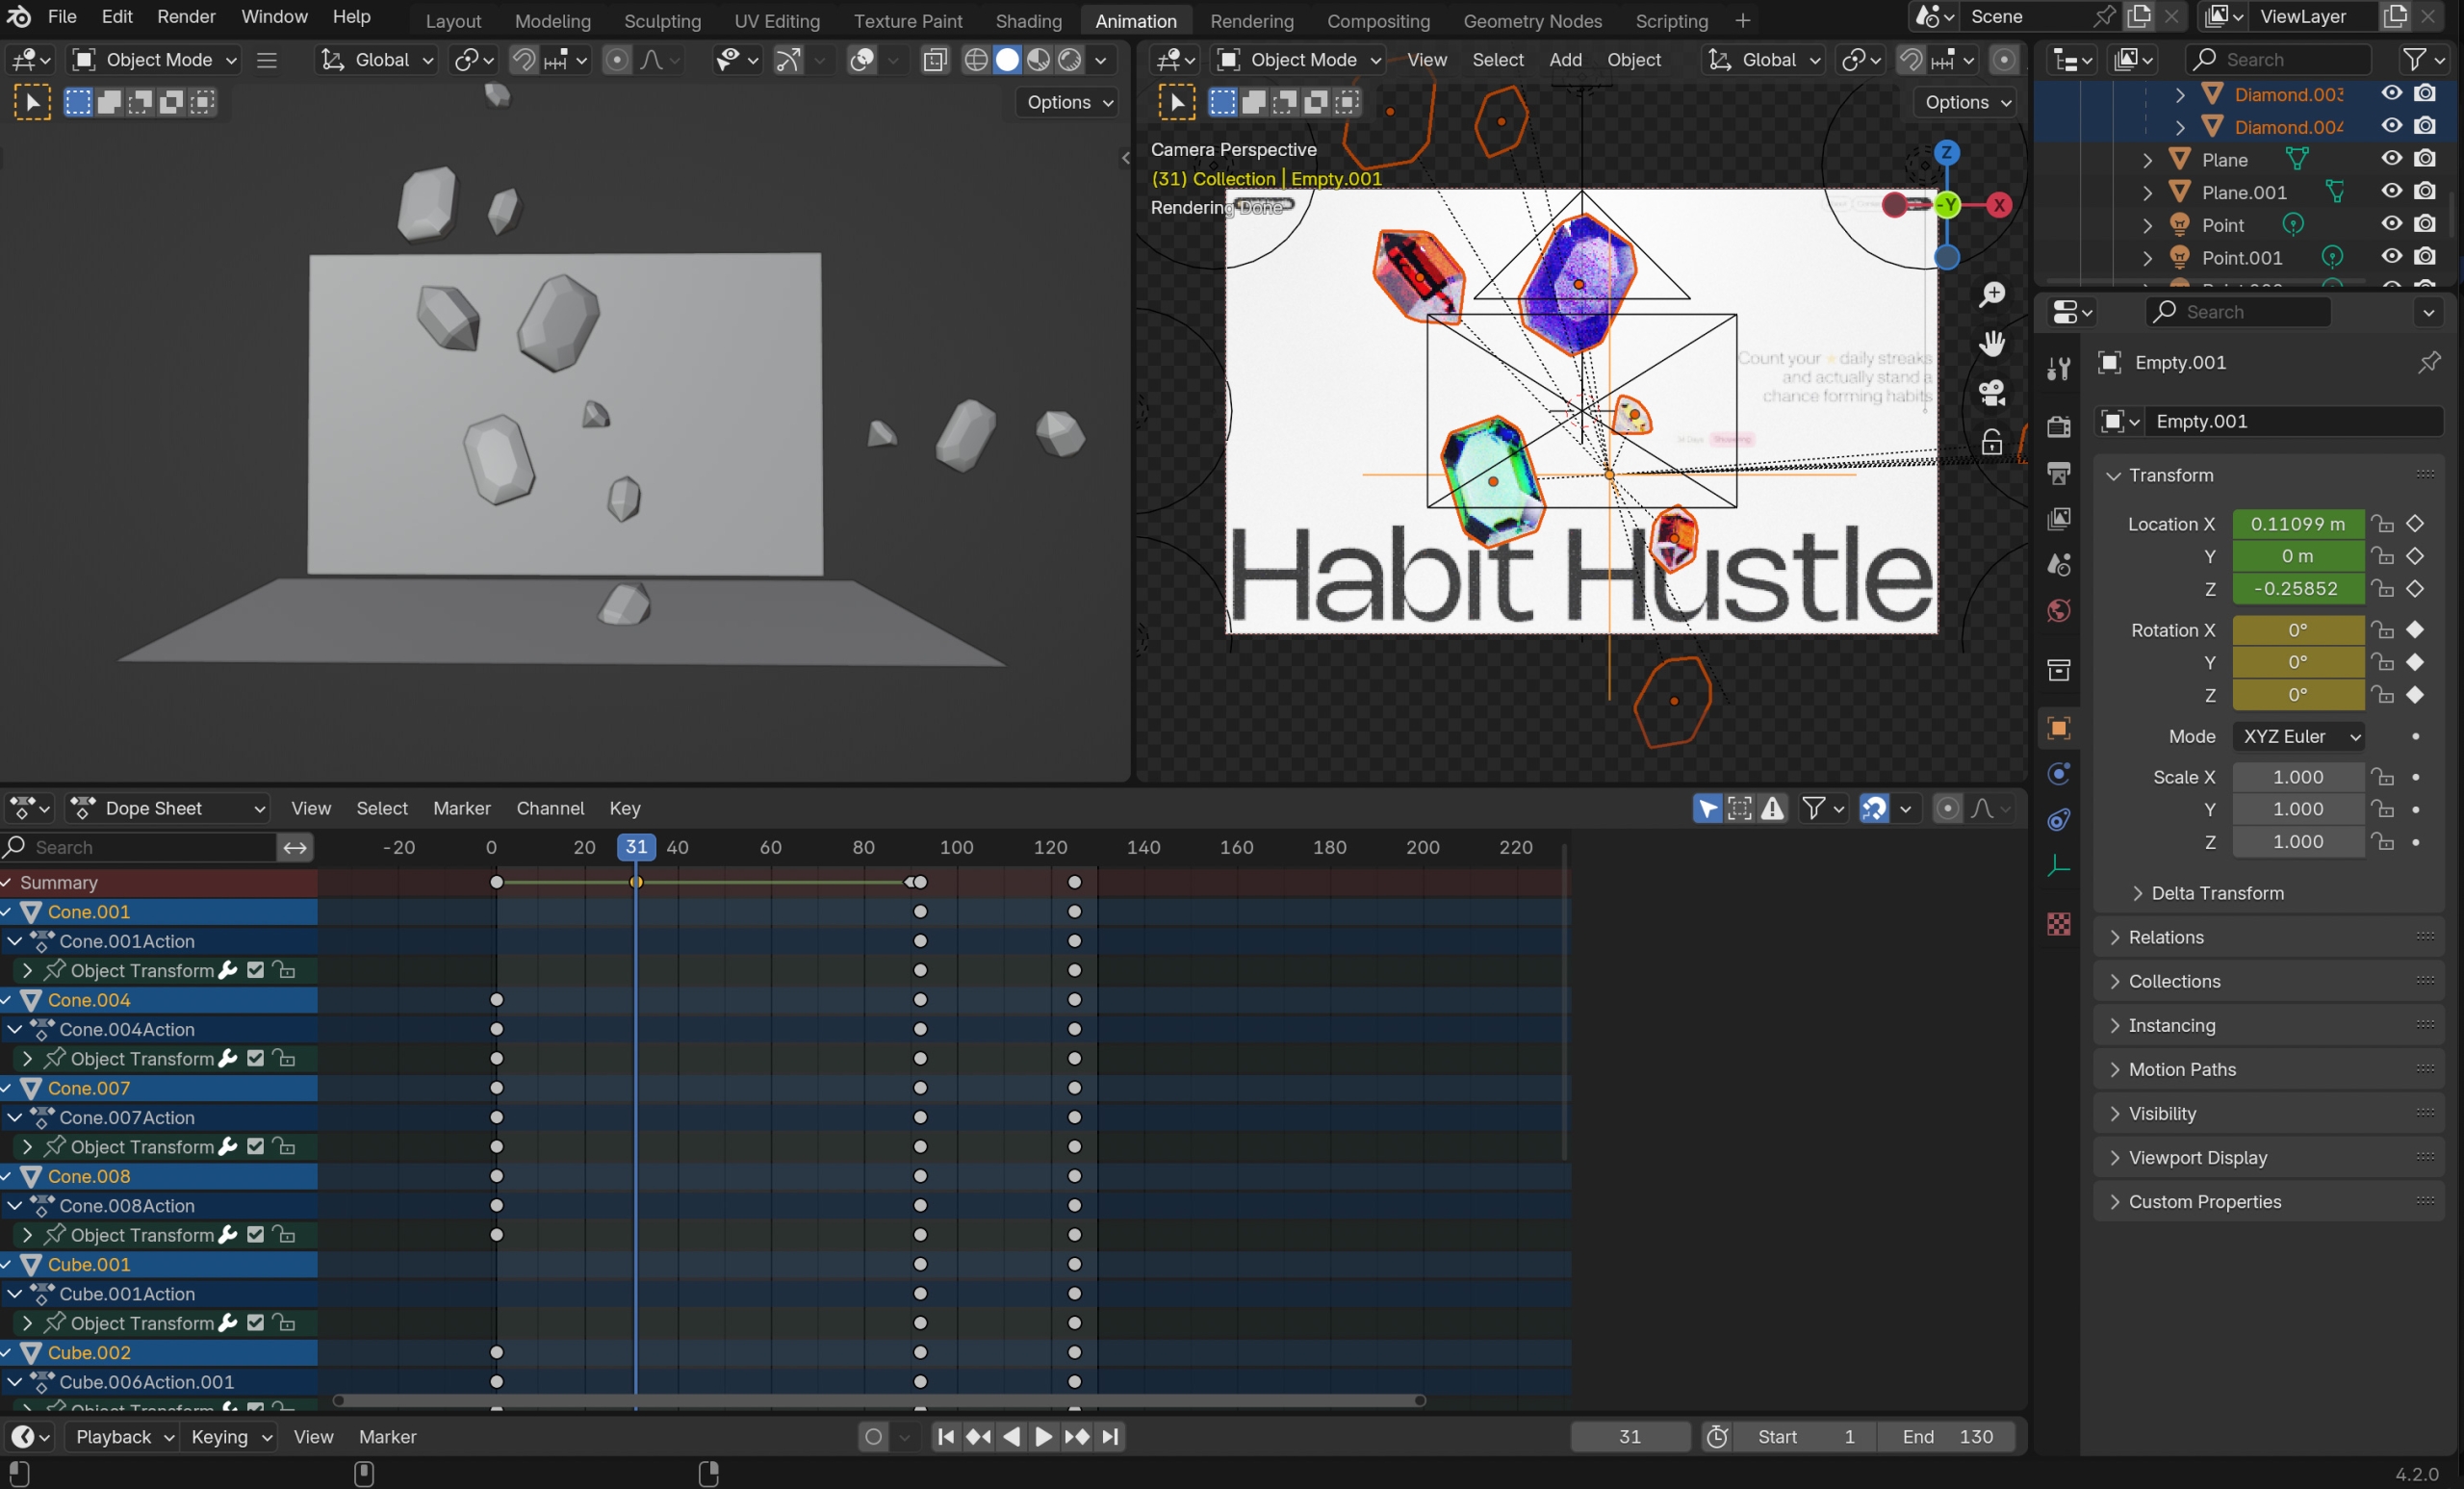
4. Construct the Animation in Blender
The animation workflow in Blender is one thing I’m nonetheless making an attempt to enhance on. One of the best half about Blender is that almost any property might be animated – every little thing from shader values to the place of components. The worst half is that it’s troublesome to get a high-level overview of your animation and see the entire items working collectively.
It’s fairly simple to get began although.
- Set the beginning body of the animation – Open up the animation tab and transfer the cursor on the timeline to the place the motion ought to start
- Choose which object to animate within the scene – That is the place issues get a bit tough. To see what has been animated, the aspect must be chosen to disclose it within the timeline.
- Set a keyframe for the item’s beginning worth – Nearly something might be animated which permits for thus many potentialities. Hover over the property you need to animate (i.e. place within the Object properties panel) and press I or the white dot subsequent to the property. The primary keyframe ought to be positioned on the timelineand the property you chose will change to yellow. Within the screenshot under, you’ll be able to see the yellow animated properties on the appropriate. Inexperienced properties means the property is anmiated, however there isn’t a keyframe on the present body within the timeline.
- Transfer the timeline cursor to the ending body of the animation
- Modify the animated property – You are able to do this manually if it’s a price like a part of shader node tree or the simply transfer or rotate your object.
- Set a brand new keyframe for the brand new object property – Hover the property that was animated and both hit I or click on the diamond keyframe icon subsequent to the animated property. It’s actually vital to recollect to set the brand new keyframe, in any other case Blender gained’t put it aside if you hit play on the animation or transfer to a brand new body within the timeline. One of many extra irritating components is shifting round a number of objects and forgetting to set a brand new keyframe then dropping all that work.
- Play the animation – When you’re watching the animation in Cycles, I’d counsel saving your work for certain earlier than previewing the animation. Blender can crash unexpectedly right here if it’s making an attempt to play an animation whereas rendering. To play or pause the animation, simply hit house bar.
Save usually! Blender crashes fairly a bit and at all times unexpectedly. It typically crashes once I’m previewing an animation or if I’m caching one thing with physics.
5. Render a Check from Blender into AfterEffects
Earlier than making the ultimate render, I’ll do a fast render with the Workbench render engine in Blender to check the animations in AfterEffects to additional sync up the timings. This may be tedious to match the easing curves and it helps to attempt to do any large, scroll actions in AfterEffects. I usually do step 3 and step 4 a number of instances to tweak the 2 animations to get them good.
The toughest half is the render time with glass animations. I averted doing any distorted textual content behind the gems on this one as a result of you’ll be able to cheat a bit extra in AE and don’t must get every little thing excellent.
I additionally cheated a bit right here and broke the gem animations into two components: the primary scroll the place the gems scale right into a carousel and the clicking interplay the place the gemstone scales up and the remainder drop out.
6. Loop Animation and Finalize Particulars
After the take a look at render is within the comp, I begin engaged on the ultimate bits of animation. That is the place I begin including all the ultimate particulars since all of the items are collectively now and it’s a lot simpler to tweak.
Usually, I attempt to construct the looping a part of the animation earlier than I render out the ultimate render from Cycles in Blender to save lots of time. About half the time, I spotted I wanted to alter some timings or the size of the Blender animation to make the loop seamless.
A trick I’ve discovered to make looping the animation simpler to get actual is to construct the loop in a dad or mum composition, add the web page wipes there, after which duplicate your web page animation layer and restart it on the similar level as your animation begins.
The loop is pointless for dev prototypes and consumer initiatives, however it certain does look good for social media and case research. ✨
7. Render the Ultimate Animation in Blender with Cycles
Protecting my fingers crossed that the ultimate render will end up, I begin the ultimate render from Blender which might take hours, particularly with glass supplies. If I get fortunate, the primary render will likely be shut sufficient and I can do some AfterEffects methods to wash it up and if I’m not so fortunate, I’ll have to render once more.
Ultimate Consequence
After which all achieved! Generally it will probably take a number of renders or repeating a number of of the steps.
These prototypes are at all times enjoyable to do as a result of it’s uncommon that I get to make as polished an animation in consumer initiatives and they’re an opportunity to follow new expertise. Generally they repay when a consumer likes a particular animation and I’m capable of reuse the identical concept afterward. One of the best recommendation I’ve discovered for these facet challenge posts is to have enjoyable with them and maintain them gratifying. Studying new expertise is a giant time dedication and I at all times attempt to stick to issues that I discover fascinating and ditch the issues I discover boring.
Thanks for scrolling!
– Michael

